ElasticSearch不用多说,全文检索领域的不二之选,基于Apache的Lucene,其分布式的数据存储基本上能够保证任何容量要求。自身提供Restful的API接口,能够满足准确、实时、快速的搜索场景,是当前流行的企业级搜索引擎。
安装ElasticSearch
可以参考官方文档https://www.elastic.co/guide/en/elasticsearch/reference/current/index.html。
1、依赖java环境,请先自行安装jdk
2、官网下载 https://www.elastic.co/cn/downloads/elasticsearch,选择对应版本。我是ubuntu,选择了MACOS/LINUX,6.5.1版本
3、解压
tar -zxvf elasticsearch-6.5.1.tar.gz
cd elasticsearch-6.5.1
4、配置修改
使用默认配置文件config/elasticsearch.yml即可,默认不需要修改。可以配置http端口,通信端口,集群名称,节点名称等
5、bin/elasticsearch启动es
6、访问http://localhost:9200/看到如下输出,证明ES启动成功
{
  "name": "JEsiUOX",
  "cluster_name": "elasticsearch",
  "cluster_uuid": "d_6JE1ScQiqP3WRXhwaz_w",
  "version": {
    "number": "6.5.1",
    "build_flavor": "default",
    "build_type": "tar",
    "build_hash": "8c58350",
    "build_date": "2018-11-16T02:22:42.182257Z",
    "build_snapshot": false,
    "lucene_version": "7.5.0",
    "minimum_wire_compatibility_version": "5.6.0",
    "minimum_index_compatibility_version": "5.0.0"
  },
  "tagline": "You Know, for Search"
}
安装可视化前端
两种选择,elasticsearch-head或者kibana。初学者建议使用elasticsearch-head,界面简单,操作直观,能满足最基本的操作需求。
1、elasticsearch-head安装
Elasticsearch 从5.x起就已经不支持elasticsearch-head作为插件使用,所以网上千篇一律的plugin安装方法已经失效。新版本只能作为独立server使用,即需要启动自己的nodejs作为webserver,所以需要node环境,没有的自行安装即可.
git clone git://github.com/mobz/elasticsearch-head.git
cd elasticsearch-head

# 安装依赖 指定淘宝的npm源加速
npm install --registry=https://registry.npm.taobao.org

# 启动server
npm run start
会看到如下输出,访问http://localhost:9100即可看到web界面
> elasticsearch-head@0.0.0 start /home/qii/ppp/elasticsearch-head
> grunt server

(node:29971) ExperimentalWarning: The http2 module is an experimental API.
Running "connect:server" (connect) task
Waiting forever...
Started connect web server on http://localhost:9100
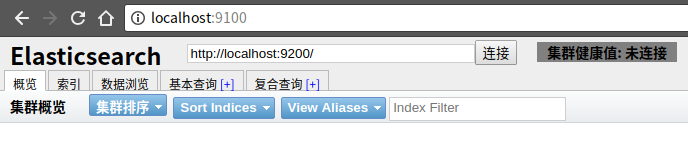
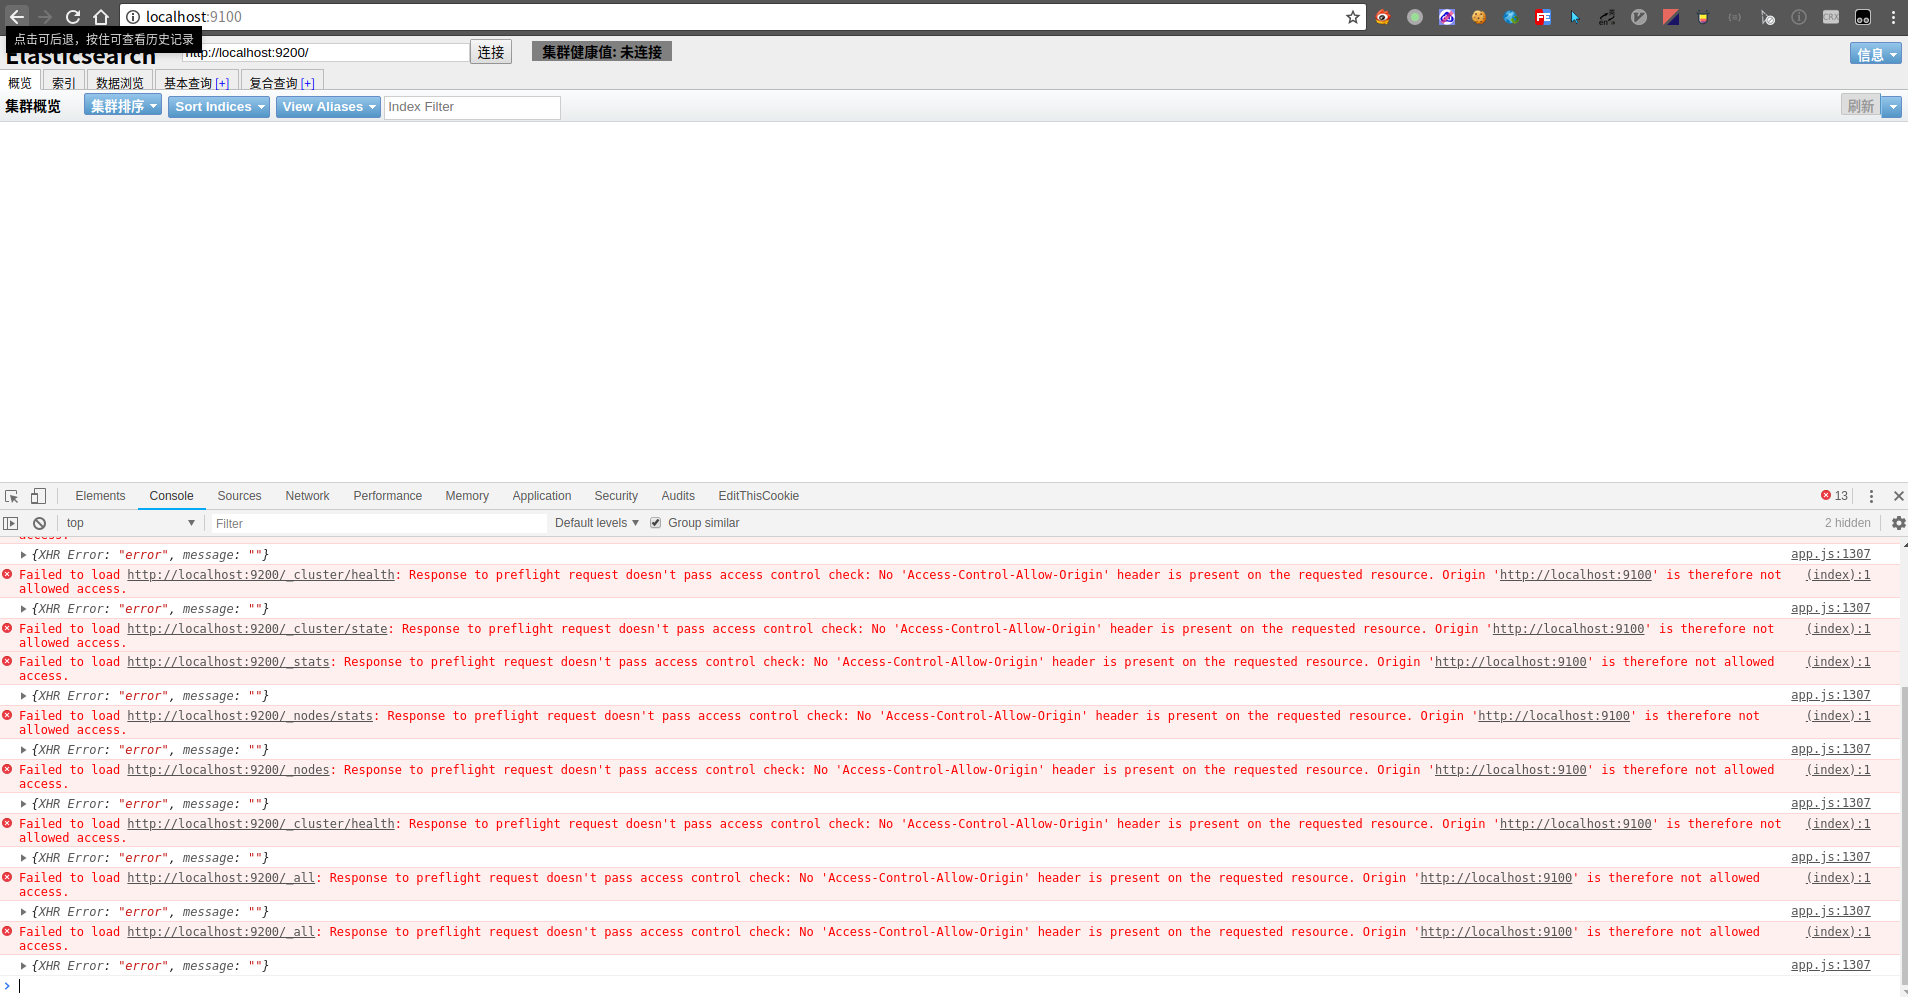
但是注意界面上连接按钮右边【上图右上角】会有集群健康值: 未连接字样显示,表明elasticsearch-head还没有连接上ES server,打开console的话,会看到如下报错,很明显,跨域问题导致
解决办法:让ES server支持跨域。停止ES服务,编辑config/elasticsearch.yml配置文件,在最后面追加上如下跨域设置后重新启动:
http.cors.enabled: true
http.cors.allow-origin: "*"
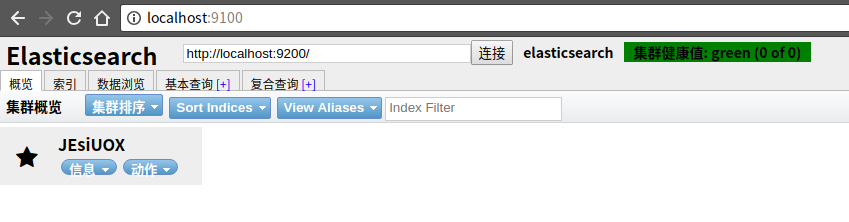
即可看到连接已成功,右上角变成绿色文字集群健康值: green (0 of 0)
2、kibana安装
官网下载地址 https://www.elastic.co/downloads/kibana,选择自己需要的版本,我选择的是LINUX 64-BIT
# 解压
tar -zxvf kibana-6.5.1-linux-x86_64.tar.gz
cd kibana-6.5.1-linux-x86_64/

# 启动kibana服务
bin/kibana
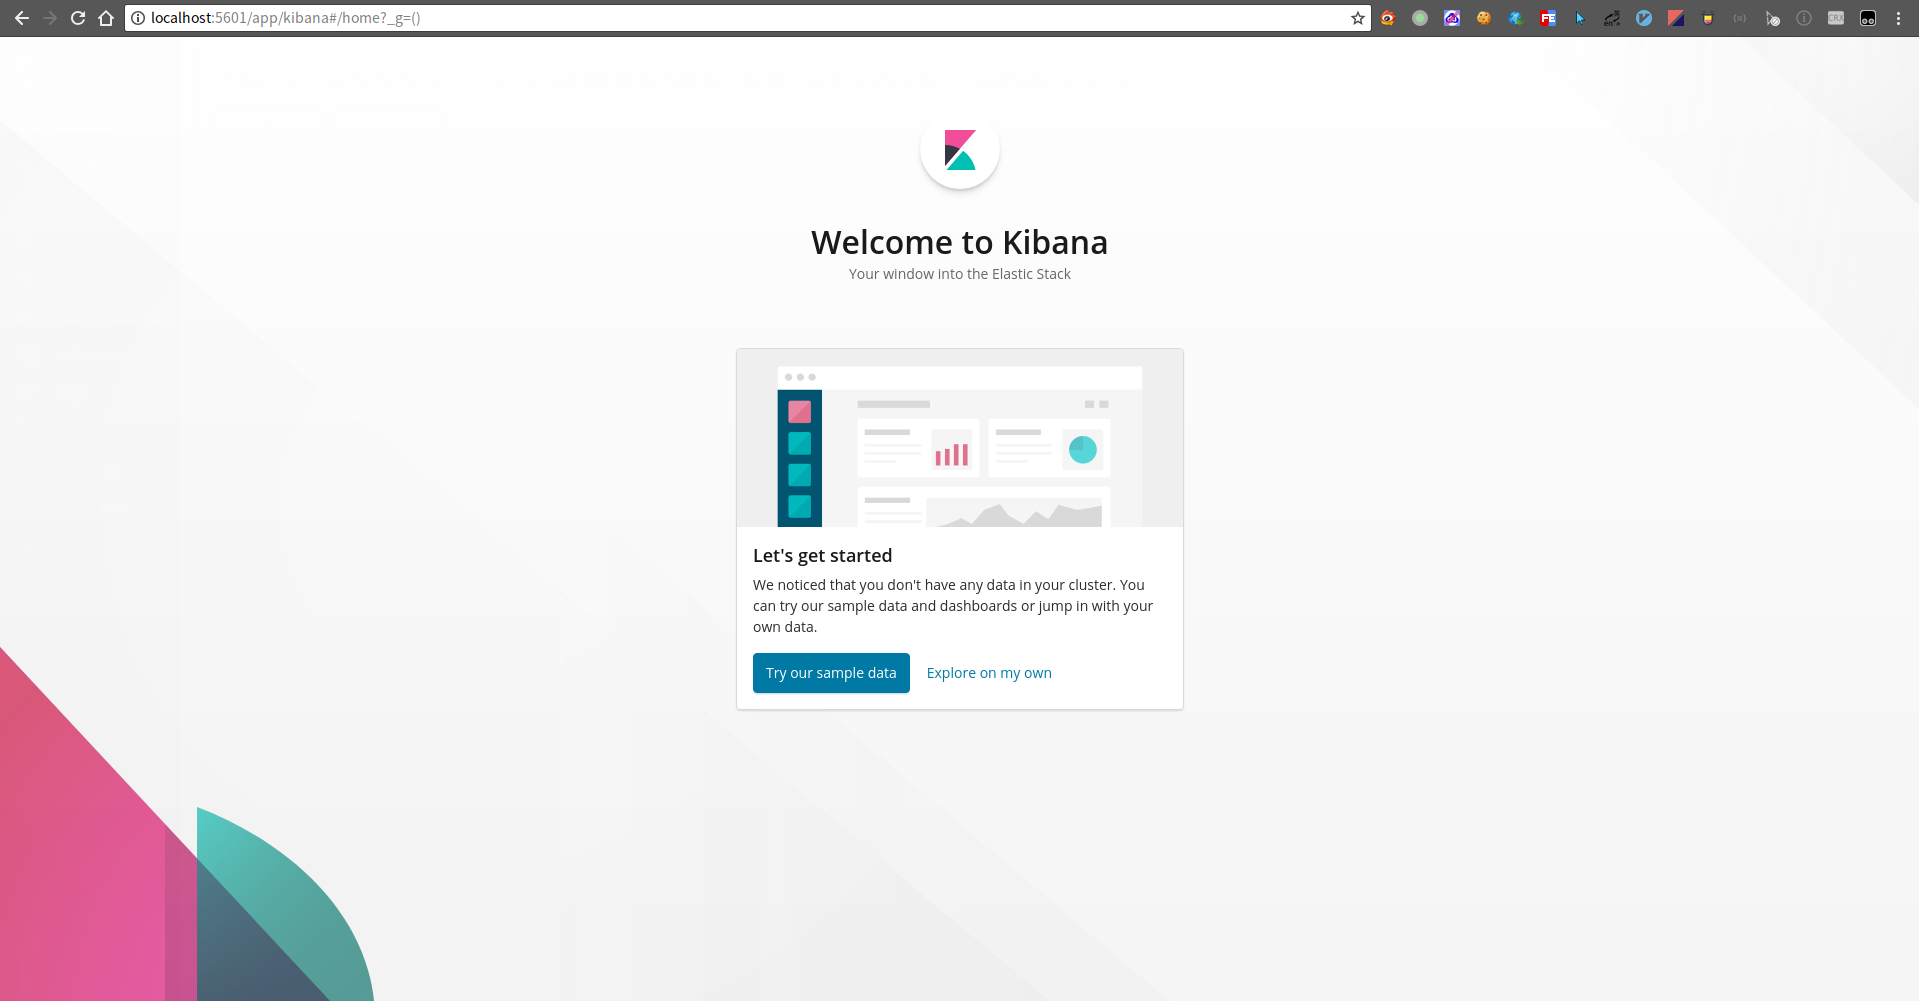
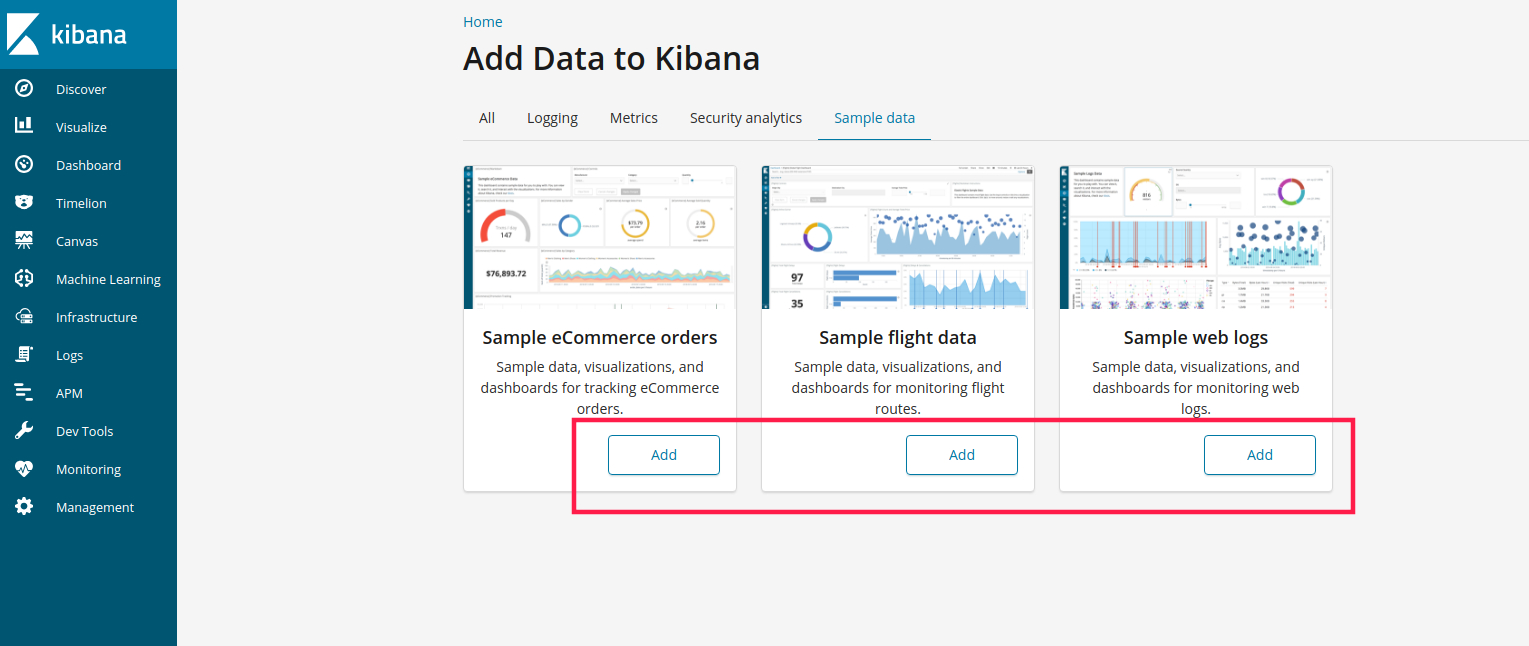
默认配置在config/kibana.yml,可以指定web端口,默认访问http://localhost:5601即可看到如下界面,选择默认的Try our sample data即可
样例数据我们分别点击添加
基本操作界面位于下图处,可以进行数据的增删改查:
ElasticSearch数据基本操作
数据的增删改查操作都可以通过ES的Rest API实现,即可以用任何工具通过ES的接口实现数据操作,甚至是浏览器。下面介绍的可视化操作使用
elasticsearch-head实现。当然,你也可以参考git-book的翻译
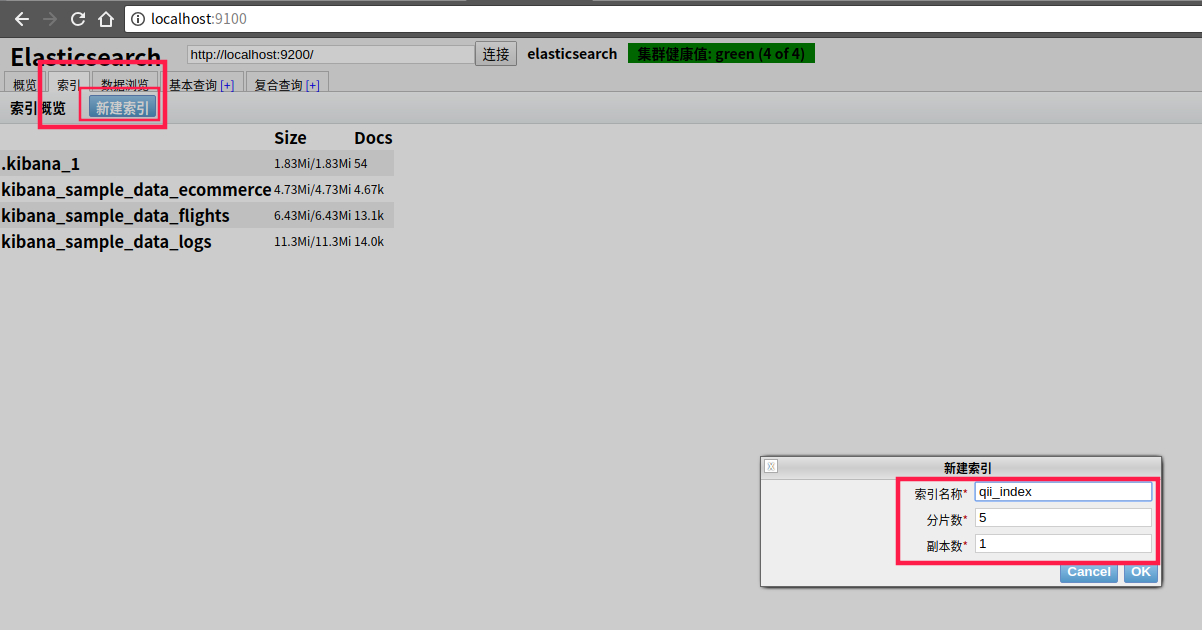
1、添加index
index【索引】相当于Mysql中的database概念,一个index就是一个数据库
其中分片数shards表明该索引会被切分成几份存储,这样能够使一个索引水平的存储在不同的节点上,盛放更多的数据。副本数replicas指定了对应分片复制的份数,当一个分片坏掉的时候,至少还有备份的复制分片可以使用。
2、添加type
type相当于Mysql中table的概念,一个type就是一个表
值得一提的是,ES的表不用手动创建,会在你插入数据的时候自动创建,下面插入数据的时候会有说明。
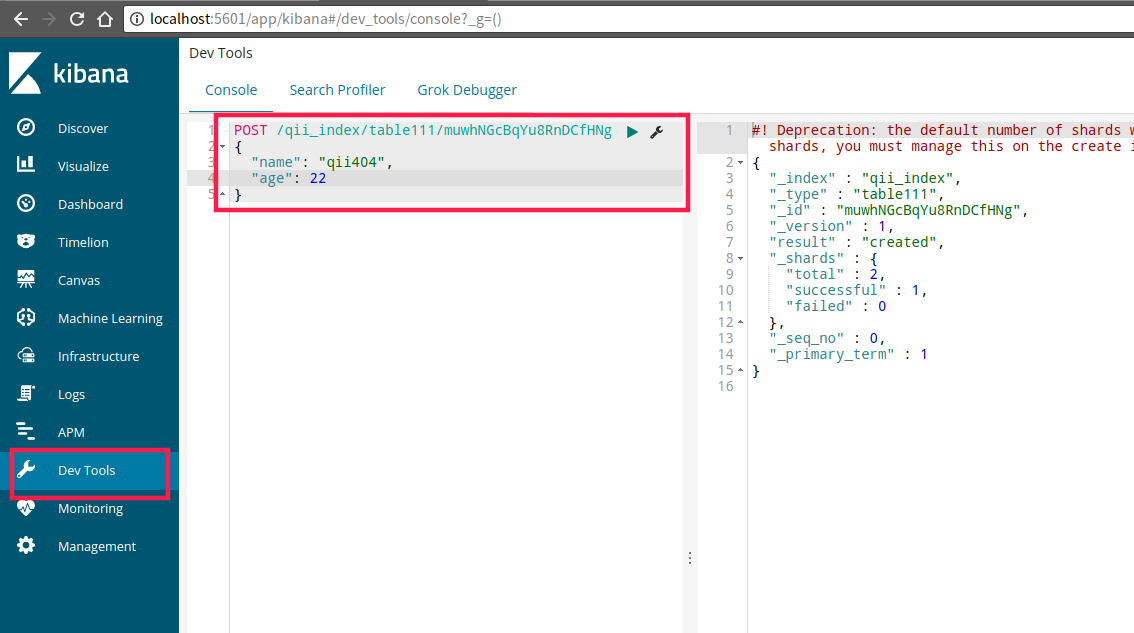
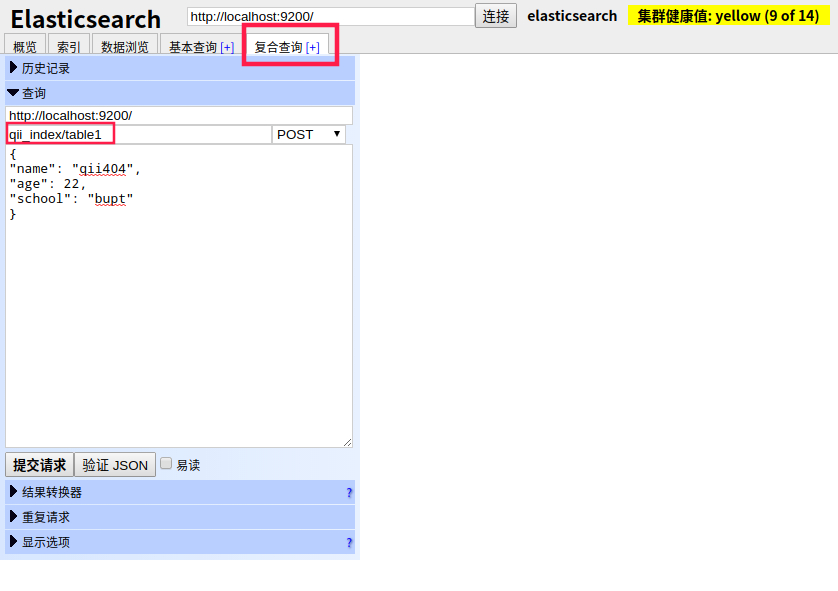
3、添加document
document即文档,相当于Mysql中的一条数据,ES的数据类似于Mongo,是基于Scheme的,很像Json,如["name": "qii404", "age": 23]。我们通过复合查询功能框模拟Curl请求实现。
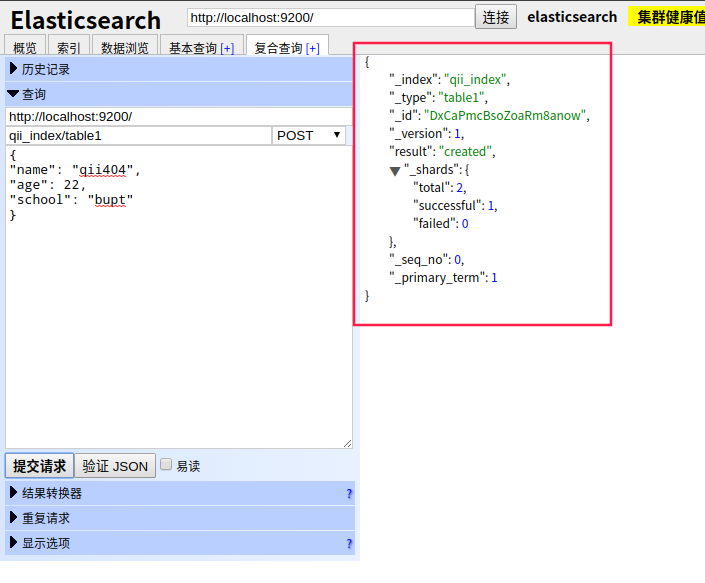
注意下图中的qii_index/table1就是database/table,qii_index为我们刚才创建的索引【库】,table1即需要插入的type【表】,并且table1在不存在时会自动创建
点击提交请求按钮【注意添加数据必须为POST方法,下面填写你想要添加的数据结构】,右边会显示提交结果,_id字段即为自动生成的数据唯一id
4、查询数据
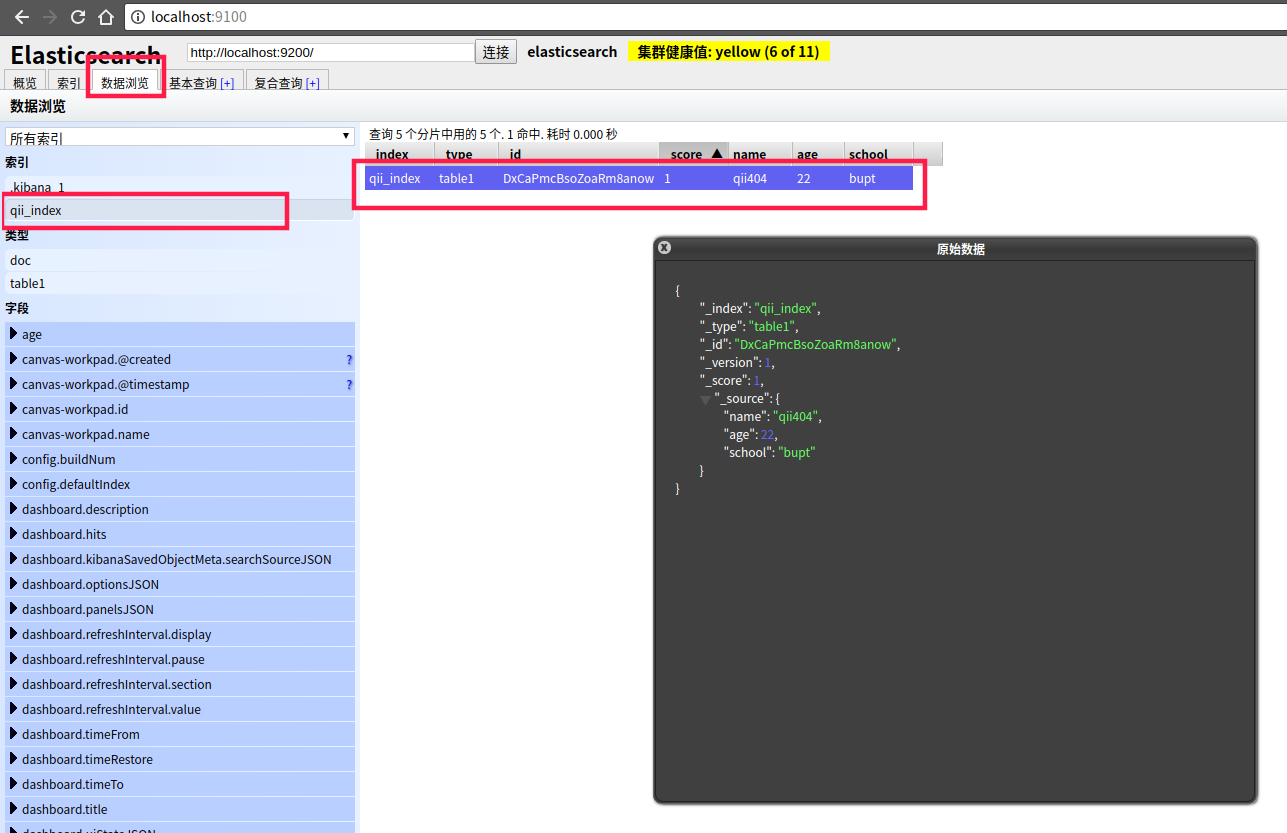
通过数据浏览功能,依次点击索引名,以及右侧的数据行,即可展示出该条数据的详情
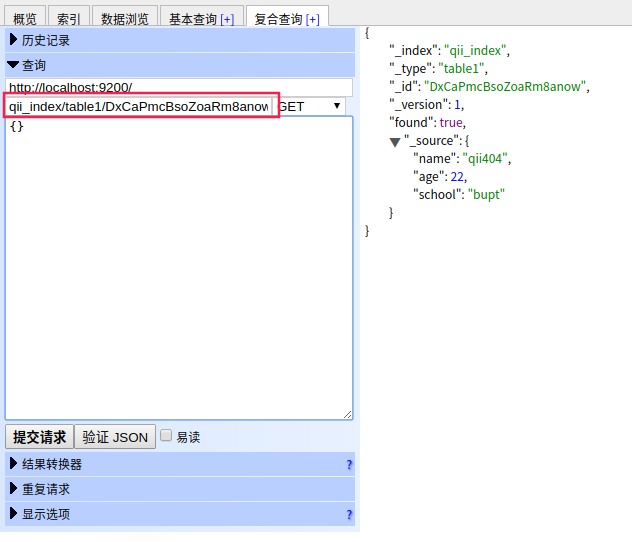
当然,我们也可以使用查询功能实现,qii_index/table1/DxCaPmcBsoZoaRm8anow为database/table/id,注意使用GET方法,最后补齐id即可
ES数据搜索和匹配
基本用法可以参考https://www.elastic.co/guide/en/elasticsearch/reference/current/search.html
DSL语法参考https://www.elastic.co/guide/en/elasticsearch/reference/current/query-dsl.html
中文参考【但已经过时】https://www.elastic.co/guide/cn/elasticsearch/guide/current/_finding_exact_values.html
基础语法说明如下
| 关键词 | 说明 |
|---|---|
| match_all | 查询简单的 匹配所有文档。在没有指定查询方式时,它是默认的查询 |
| match | 用于全文搜索或者精确查询,如果在一个精确值的字段上使用它, 例如数字、日期、布尔或者一个 not_analyzed 字符串字段,那么它将会精确匹配给定的值 |
| range | 查询找出那些落在指定区间内的数字或者时间 gt 大于;gte 大于等于;lt 小于;lte 小于等于 |
| term | 被用于精确值 匹配 |
| terms | terms 查询和 term 查询一样,但它允许你指定多值进行匹配 |
| exists | 查找那些指定字段中有值的文档 |
| missing | 查找那些指定字段中无值的文档 |
| must | 多组合查询 必须匹配这些条件才能被包含进来 |
| must_not | 多组合查询 必须不匹配这些条件才能被包含进来 |
| should | 多组合查询 如果满足这些语句中的任意语句,将增加 _score ,否则,无任何影响。它们主要用于修正每个文档的相关性得分 |
| filter | 多组合查询 这些语句对评分没有贡献,只是根据过滤标准来排除或包含文档 |
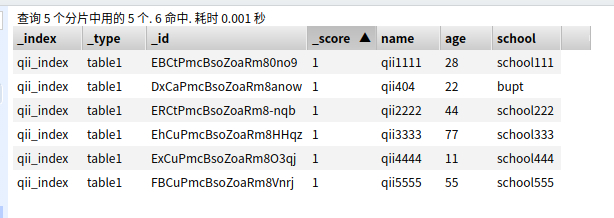
准备数据,随便插入了几条数据准备测试
1、单字段匹配 where name = 'qii111'
match代表匹配查询,包含单词即可;term是完全匹配查询,即不对搜索词进行分词器分析,文档中必须完整包含整个搜索词汇
{
  "query": {
    "match": {
      "name": "qii111"
    }
  }
}

or

{
  "query": {
    "term": {
      "name": "qii111"
    }
  }
}
2、多字段查询 where name = 'qii111' and age = 23
{
  "query": {
    "bool": {
      "must": [
        {
          "term": {
            "name": "qii111"
          }
        },
        {
          "term": {
            "age": 23
          }
        }
      ]
    }
  }
}
3、任意字段匹配查询
指定字段中,如果有任意一个字段符合条件就会被选出,如
name或者desc中只要一个字段包含what或者this,就符合条件
{
  "query": {
    "multi_match": {
      "query": "what this",
      "fields": [
        "name",
        "desc"
      ]
    }
  }
}
4、年龄范围查询 where age between 10 and 40
{
  "query": {
    "range": {
      "age": {
        "gte": 10,
        "lte": 40
      }
    }
  }
}
5、查询desc中同时包含what this两个单词的 where desc like '%what% and desc like '%this%'
{
  "query": {
    "match": {
      "desc": {
        "query": "what this",
        "operator": "and"
      }
    }
  }
}
6、查询desc中包含what 或者this任意一个单词的 where desc like '%what% or desc like '%this%'
{
  "query": {
    "match": {
      "desc": {
        "query": "what this",
        "operator": "or"
      }
    }
  }
}
7、查询name以某个单词开头的 where name like 'qii%'
{
  "query": {
    "prefix": {
      "name": "qii"
    }
  }
}
8、一个复杂的请求,等价于sql中的where name like '%qii111%' and age != 11 and (desc like '%haha%' or desc like '%this%')
{
  "query": {
    "bool": {
      "must": {
        "match": {
          "name": "qii111"
        }
      },
      "must_not": {
        "match": {
          "age": 11
        }
      },
      "should": [
        {
          "match": {
            "desc": "haha"
          }
        },
        {
          "match": {
            "desc": "this"
          }
        }
      ]
    }
  }
}
使用Curl请求实现ES查询
下面curl介绍中的url为 http://localhost:9200/qii_index/table1/?pretty,其中qii_index/table1代表index/type。并且追加了pretty参数,这样返回结果会是格式化好的json格式,看起来会更直接。
1、添加数据
下面没有手动指定唯一id,所系统会自动生成id。如果
table1后面形如table1/112233这种追加了我们指定的全新id,就会以112233为唯一id插入一条新纪录【如果已经存在该id记录,则为更新操作】
curl -XPOST "http://localhost:9200/qii_index/table1/?pretty" -H "Content-Type: application/json" --data '{"name":"qii444","age":66,"desc":"XHDK-A-1293-#fJ3"}'
2、查询刚插入的数据
table1后面紧跟着的
M_0Gl2cBCt9xRZeebyH4就是之前插入时返回的唯一id
curl -XGET "http://localhost:9200/qii_index/table1/M_0Gl2cBCt9xRZeebyH4?pretty"
3、修改数据
table1后面是要修改的数据id
curl -XPOST "http://localhost:9200/qii_index/table1/M_0Gl2cBCt9xRZeebyH4?pretty" -H "Content-Type: application/json" --data '{"name":"qii444","age":66,"desc":"huhuhaha~~"}'
4、删除索引
curl -XDELETE -H "Content-Type: application/json" 'localhost:9200/qii_index/?pretty'
5、创建索引
curl -XPUT 'localhost:9200/my_store?pretty' -H "Content-Type: application/json"
6、创建指定字段类型的索引
创建my_store索引,并且指定productID字段为不纳入索引搜索范围
curl -XPUT 'localhost:9200/my_store?pretty' -H "Content-Type: application/json" --data '
{
    "mappings" : {
        "products" : {
            "properties" : {
                "productID" : {
                    "type" : "text",
                    "index" : false
                }
            }
        }
    }

}'
7、批量新增或更新
id不存在则插入,存在则更新,注意下面是先指定id,然后紧跟数据列的格式,并且data最后面要跟个换行
curl -XPOST 'localhost:9200/qii_index/table1/_bulk?pretty' -H "Content-Type: application/json" --data '
{ "index": { "_id": 1 }}
{ "name" : "qii101", "age": 23, "desc": "what the fuck" }
{ "index": { "_id": 2 }}
{ "name" : "qii102", "age": 22, "desc": "what the fuck" }
{ "index": { "_id": 3 }}
{ "name" : "qii103", "age": 24, "desc": "what the fuck" }
'
分析查询字段的分词情况
目的是为了让开发者知道ES内部时如何分析词汇并且进行查询的。线下调试追查使用,不建议线上执行
# analyzer指定分析引擎,默认就是standard,可以换成如 whitespace 、simple 和 english等引擎

curl -XPOST "http://localhost:9200/_analyze?pretty" -H "Content-Type: application/json" --data '{
  "analyzer": "standard",
  "text": "你好233,hello world"
}'
返回分词结果如下,可见查询时会先切成["你", "好", "233", "hello", "world"]关键词,然后根据关键词匹配
{
  "tokens" : [
    {
      "token" : "你",
      "start_offset" : 0,
      "end_offset" : 1,
      "type" : "<IDEOGRAPHIC>",
      "position" : 0
    },
    {
      "token" : "好",
      "start_offset" : 1,
      "end_offset" : 2,
      "type" : "<IDEOGRAPHIC>",
      "position" : 1
    },
    {
      "token" : "233",
      "start_offset" : 2,
      "end_offset" : 5,
      "type" : "<NUM>",
      "position" : 2
    },
    {
      "token" : "hello",
      "start_offset" : 6,
      "end_offset" : 11,
      "type" : "<ALPHANUM>",
      "position" : 3
    },
    {
      "token" : "world",
      "start_offset" : 12,
      "end_offset" : 17,
      "type" : "<ALPHANUM>",
      "position" : 4
    }
  ]
}
自定义分词器
{
    "xxx": {
        "type":     "string",
        "analyzer": "english" // whitespace or simple or standard
    }
}
关于字段索引属性
我们可以手动指定每个字段的索引属性,索引类型,如下
{
    "xxx": {
        "type":     "string",
        "index":    "not_analyzed"
    }
}
index 属性控制怎样索引字符串。它可以是下面三个值
| index | 说明 |
|---|---|
| analyzed | 首先分析字符串,然后索引它。换句话说,以全文索引这个域。 |
| not_analyzed | 索引这个域,所以它能够被搜索,但索引的是精确值。不会对它进行分析。 |
| no | 不索引这个域。这个域不会被搜索到。 |
Tips: string 域 index 属性默认是 analyzed 。如果我们想映射这个字段为一个精确值,我们需要设置它为 not_analyzed. 其他简单类型(例如 long , double , date 等)也接受 index 参数,但有意义的值只有 no 和 not_analyzed , 因为它们永远不会被分析。
常用异常报错处理
1、form数据不正确
{
  "error" : "Content-Type header [application/x-www-form-urlencoded] is not supported",
  "status" : 406
}
解决方法:curl请求时增加application/json头部即可,如下
curl -H "Content-Type: application/json" ...
2、handler不存在
{
  "error" : {
    "root_cause" : [
      {
        "type" : "mapper_parsing_exception",
        "reason" : "No handler for type [string] declared on field [productID]"
      }
    ],
    "type" : "mapper_parsing_exception",
    "reason" : "Failed to parse mapping [products]: No handler for type [string] declared on field [productID]",
    "caused_by" : {
      "type" : "mapper_parsing_exception",
      "reason" : "No handler for type [string] declared on field [productID]"
    }
  },
  "status" : 400
}
解决方法:5.X以上版本没有string类型了,使用text或者keyword作为字符串类型即可。